Object-Oriented Programming with Java, part I + II

This material is licensed under the Creative Commons BY-NC-SA license, which means that you can use it and distribute it freely so long as you do not erase the names of the original authors. If you make changes in the material and want to distribute this altered version of the material, you have to license it with a similar free license. The use of the material for commercial use is prohibited without a separate agreement.
Authors: Arto Hellas, Matti Luukkainen
Translators to English: Emilia Hjelm, Alex H. Virtanen, Matti Luukkainen, Virpi Sumu, Birunthan Mohanathas, Etiënne Goossens
Extra material added by: Etiënne Goossens, Maurice Snoeren, Johan Talboom
The course is maintained by De Haagse Hogeschool
1. The program and the source code
1.1 Source code
A computer program is composed of commands written in the source code. A computer generally runs commands in the source code from top to bottom and from left to right. Source code is saved in a textual format and will be executed somehow.
1.2 Commands
Computers execute different operations, or actions, based on the commands. For example, when printing the text “Hello world!” on the screen, it is done by the command System.out.println.
System.out.println("Hello world!");
The System.out.println command prints the string given inside the brackets on the screen. The suffix ln is short for the word line. Therefore, this command prints out a line. This means that after the given string has been printed, the command will also print a line break.
1.3 Compiler and interpreter
Computers do not directly understand the programming language we are using. We need a compiler between the source code and the computer. When we are programming using the command line interface, the command javac Hello.java will compile the Hello.java file into bytecode, which can be executed using the Java interpreter. To run the compiled program, you can use the command java Hello where Hello is the name of the original source code file.
When using a modern development environment (more on this later), it will take care of compiling the source code. When we choose to run the program, the development environment will compile and execute the program. All development environments compile source code while it is being written by the programmer, which means that simple errors will be noticed before executing the program.
1.4 Components of commands
1.4.1 Semicolon
A semicolon ; is used to separate different commands. The compiler and the interpreter both ignore line breaks in the source code, so we could write the entire program on a single line.
In the example below we will use the System.out.print command, which is similar to the System.out.println command except that it will not print a line break after printing the text.
Example of how the semicolons are used
System.out.print("Hello "); System.out.print("world");
System.out.print("!");
Hello world!
Even though neither the compiler nor the interpreter need line breaks in the source code, they are very important when considering human readers of the source code. Line breaks are required to divide source code in a clear manner. Readability of source code will be emphasized throughout this course.
1.4.2 Parameters (information passed to commands)
The information processed by a command are the parameters of a command. They are passed to the command by placing them between () brackets that follow the command name. For example, the System.out.print command is given the text hello as a parameter as follows: System.out.print("hello").
1.4.3 Comments
Comments are a useful way to make notes in the source code for yourself and others. There are 2 different ways of adding comments to your code.
- By adding
//in front of the comment.
Everything on a line after the//will be treated as comments - By putting
/*and*/around the comment.
Everything inbetween the/*and*/will be treated as comments, even newlines. This can be used for multiline comments. This is very often used for adding documentation to your code, more on that in week 2
1.4.4 Example of using comments
// We will print the text "Hello world"
System.out.print("Hello world");

System.out.print(" and all the people of the world."); // We print more text to the same line.

/*
System.out.print("This line will also not be executed");
*/

System.out.print("Hello" /* this was hello world*/);

// System.out.print("this line will not be executed, because it is commented out");
The last line of the example introduces a particularly handy use for comments: you can comment out code instead of completely deleting it if you want to temporarily try out something.
You can quickly comment and uncomment multiple lines in IntelliJ by selecting the lines you want to comment, and pressing Ctrl + /.
1.5 More about printing
As we can see from the examples above, there are two commands for printing.
System.out.printprints the text without the line break at the endSystem.out.printlnprints the text and the line break
The printed text can contain both traditional characters and special characters. The most important special character is \n, which stands for a line break. There are also other special characters.
System.out.println("First\nSecond\nThird");
When executed, the example above prints:
First
Second
Third
These special characters are called escape characters, and always start with a \. Other special characters are
\t
Prints a tab character and aligns the next text\\
Prints a backspace () character\"
Prints a “ character\'
Prints a ‘ character
A full reference of characters can be found at the java website
1.6 Main program body
The body for a program named “Example” is as follows:
public class Example {
    public static void main(String[] args) {
        // program code
    }
}
The program is stored in a text file named after the program with the .java extension. For a program named Example, the file should be named Example.java.
The execution of the program begins at the part marked with the // program code comment above. During our first week of programming, we will limit ourselves to this part. When we are talking about commands such as printing, we need to write the commands into the program body. For example: System.out.print("Text to be printed");
public class Example {
    public static void main(String[] args) {
        System.out.print("Text to be printed");
    }
}
From this point on, the main program body will be omitted from the examples.
1.7 Getting to know your development environment
Programming these days takes place in development environments almost without exceptions. The development environment provides several tools and features to assist the programmer. Although the development environment does not write the program on behalf of the programmer, it contains several handy features such as hinting about mistakes in code and assisting the programmer to visualize the structure of the program.
In this course, we will use the IntelliJ development environment. A guide for using IntelliJ is available here.
Exercise 1-1: Name
Create a program that prints your name to the screen.
The program output should resemble the following:
Jane DoeExercise 1-2: Hello world! (And all the people of the world)
Create a program that prints out the following:
Hello world!
(And all the people of the world)
Exercise 1-3: Spruce
Create a program that prints the following:
    *
   ***
  *****
 *******
*********
    *
2. Variables and assignment
2.1 Variables and data types
A variable is one of the most important concepts in computer programming. A variable should be imagined as a box in which you can store information. The information stored in a variable always has a type. These types include text (String), whole numbers (int), decimal numbers (double), and truth values (boolean). A value can be assigned to a variable using the equals sign (=).
int months = 12;
In the statement above, we assign the value 12 to the variable named months whose data type is integer (int). The statement is read as “the variable months is assigned the value 12”.
The value of the variable can be appended to a string with the plus + sign as shown in the following example.
String text = "includes text";
int wholeNumber = 123;
double decimalNumber = 3.141592653;
boolean isTrue = true;

System.out.println("The variable's type is String. Its value is " + text);
System.out.println("The variable's type is int. Its value is  " + wholeNumber);
System.out.println("The variable's type is double. Its value is " + decimalNumber);
System.out.println("The variable's type is boolean. Its value is " + isTrue);
Printing:
The variable's type is String. Its value is includes text
The variable's type is int. Its value is 123
The variable's type is double. Its value is 3.141592653
The variable's type is boolean. Its value is true
A variable holds its value until it is assigned a new one. Note that the variable type is written only when the variable is first declared in the program. After that we can use the variable by its name.
int wholeNumber = 123;
System.out.println("The variable's type is integer. Its value is  " + wholeNumber);

wholeNumber = 42;
System.out.println("The variable's type is integer. Its value is  " + wholeNumber);
The output is:
The variable's type is integer. Its value is 123
The variable's type is integer. Its value is 42
2.1.1 Variable data types are immutable
When a variable is declared with a data type, it cannot be changed later. For example, a text variable cannot be changed into an integer variable and it cannot be assigned integer values.
String text = "yabbadabbadoo!";
text = 42; // Does not work! :(
Integer values can be assigned to decimal number variables, because whole numbers are also decimal numbers.
double decimalNumber = 0.42;
decimalNumber = 1; // Works! :)
Exercise 1-4 : Varying variables
The exercise file initially contains a program which prints:
Chickens:
3
Bacon (kg):
5.5
A tractor:
There is none!

In a nutshell:
3
5.5
There is none!
Change the program in the specified places so that it will print:
Chickens:
9000
Bacon (kg):
0.1
A tractor:
Zetor

In a nutshell:
9000
0.1
Zetor
2.1.2 Allowed and descriptive variable names
There are certain limitations on the naming of our variables. Even though umlauts, for example, can be used, it is better to avoid them, because problems might arise with character encoding. For example, it is recommended to use A instead of Ä.
Variable names must not contain certain special characters like exclamation marks (!). Space characters cannot be used, either, as it is used to separate commands into multiple parts. It is a good idea to replace the space character using a camelCase notation. Note: The first character is always written in lower case when using the camel case notation.
int camelCaseVariable = 7;
Variable names can contain numbers as long it does not start with one. Variable names cannot be composed solely of numbers, either.
int 7variable = 4; // Not allowed!
int variable7 = 4; // A valid, but not descriptive variable name
Variable names that have been defined before cannot be used. Command names such as System.out.print cannot be used, either.
int camelCase = 2;
int camelCase = 5; // Not allowed, the variable camelCase is already defined!
It is strongly recommended to name variables so that their purpose can be understood without comments and without thinking. Variable names used in this course must be descriptive.
2.1.3 Valid variable names
- lastDay = 20
- firstYear = 1952
- name = “Matti”
2.1.4 Invalid variable names
- last day of the month = 20
- 1day = 1952
- watchout! = 1910
- 1920 = 1
2.2 Calculation
The calculation operations are pretty straightforward: +, -, * and /. A more peculiar operation is the modulo operation %, which calculates the remainder of a division. The order of operations is also pretty straightforward: the operations are calculated from left to right taking the parentheses into account.
int first = 2;   // variable of whole number type is assigned the value 2
int second = 4;  // variable of whole number type is assigned the value 4
int sum = first + second;  // variable of whole number type is assigned the value of first + second
                           //     (which means 2 + 4)

System.out.println(sum); // the value of the sum of variables is printed
int calcWithParens = (1 + 1) + 3 * (2 + 5);  // 23
int calcWithoutParens = 1 + 1 + 3 * 2 + 5;   // 13
The parentheses example above can also be done step by step.
int calcWithParens = (1 + 1);
calcWithParens = calcWithParens + 3 * (2 + 5);  // 23

int calcWithoutParens = 1 + 1;
calcWithoutParens = calcWithoutParens + 3 * 2;
calcWithoutParens = calcWithoutParens + 5;      // 13
Calculation operations can be used almost anywhere in the program code.
int first = 2;
int second = 4;

System.out.println(first + second);
System.out.println(2 + second - first - second);
2.2.1 Floating point numbers (decimal numbers)
Calculating the division and remainder of whole numbers is a little trickier. A floating point number (decimal number) and integer (whole number) often get mixed up. If all the variables in a calculation operation are integers, the end result will also be an integer.
int result = 3 / 2; // result is 1 (integer) because 3 and 2 are integers as well
int first = 3:
int second = 2;
double result = first / second;  // the result is again 1 because first and second are integers
The remainder can be calculated using the remainder operation (%). For example, the calculation 7 % 2 yields 1.
int remainder = 7 % 2; // remainder is 1 (integer)
If either the dividend or the divisor (or both!) is a floating point number (decimal number) the end result will also be a floating point number.
double whenDividendIsFloat = 3.0 / 2;  // result is: 1.5
double whenDivisorIsFloat = 3 / 2.0;   // result is: 1.5
If needed, integers can be converted to floating point using the type cast operation (double) as follows
int first = 3;
int second = 2;
double result1 = (double)first / second;  // result is: 1.5

double result2 = first / (double)second;  // result is: 1.5

double result3 = (double)(first / second);  // result is: 1
In the last example calculation, the result is rounded incorrectly because the calculation between the integers is done before the type cast to a floating point number.
If the quotient is assigned to a variable of integer type, the result will be an integer as well.
int integerResultBecauseTypeIsInteger = 3.0 / 2; // quotient is automatically integer: 1
The next example will print “1.5” because the dividend is transformed into a floating point number by multiplying it with a floating point number (1.0 * 3 = 3.0) before the division.
int dividend = 3;
int divisor = 2;

double quotient = 1.0 * dividend / divisor;
System.out.println(quotient);
What does the following code print?
int dividend = 3;
int divisor = 2;

double quotient = dividend / divisor * 1.0;
System.out.println(quotient);
From now on, make sure that you name your variables that follow good conventions like the variables in the examples above.
Exercise 1-5 : Seconds in a year
Create a program that counts how many seconds there are in a year. You can assume that a year consists of 365 days (therefore the year is not a leap year).
The program should print the following:
There are X seconds in a year.X should be replaced with the calculation of your program.
2.2.2 Changing variables
We usually want to change the value of an existing variable. This can be done using the normal assignment statement. In the next example, we increase the value of the variable age by one:
int age = 1;

System.out.println(age);  // prints 1
age = age + 1;            // the new value of age is the old value of age + 1
System.out.println(age);  // prints 2
The age = age + 1 statement increments the value of the variable age by one. It is also possible to increment a variable by one as below:
int age = 1;

System.out.println(age);  // prints 1
age++;                    // means the same as age = age + 1
System.out.println(age);  // prints 2
Another example:
int length = 100;

System.out.println(length);  // prints 100
length = length - 50;
System.out.println(length);  // prints 50
length = length * 2;
System.out.println(length);  // prints 100
length = length / 4;
System.out.println(length);  // prints 25
length--;                    // means the same as length = length - 1;
System.out.println(length);  // prints 24
2.2.3 Assignment operations
Because changing the value of a variable is a very common operation, Java has special assignment operations for it.
int length = 100;

length += 10;  // same as length = length + 10;
length -= 50;  // same as length = length - 50;
When performing the assignment operation on an existing variable, it is written as variable operation= change, for example variable += 5. Note that a variable must be defined before you can assign a value to it. Defining a variable is done by specifying the variable type and the name of the variable.
The following example will not work because the type of the variable length has not been defined.
length = length + 100;  // error!
length += 100;          // error!
When the type is defined, the operations will also work.
int length = 0;
length = length + 100;
length += 100;

// the variable length now holds the value 200
There are also other assignment operations:
int length = 100;

length *= 10;   // same as length = length * 10;
length /= 100;  // same as length = length / 100;
length %= 3;    // same as length = length % 3;

// the variable length now holds the value 1
This abbreviated notation is often used in loops (see 4.1.5 in week 2).
2.3 Concatenation or combining strings
Let us take a closer look on combining strings with the + operator.
If the + operator is used between two strings, a new string is created with the two strings combined. Note the clever use of space characters in the values of the variables below!
String greeting = "Hi ";
String name = "John";
String goodbye = ", and goodbye!";

String sentence = greeting + name + goodbye;

System.out.println(sentence);
Hi John, and goodbye!
If a string is on either side of the + operator, the other side is converted to a string and a new string is created. For example, the integer 2 will be converted into the string “2” and then combined with the other string.
System.out.println("there is an integer --> " + 2);
System.out.println(2 + " <-- there is an integer");
What we learned earlier about the order of operations is still valid:
System.out.println("Four: " + (2 + 2));
System.out.println("But! Twenty-two: " + 2 + 2);
Four: 4
But! Twenty-two: 22
Using this information, we can print a mix of strings and values of variables:
int x = 10;

System.out.println("variable x has the following value: " + x);

int y = 5;
int z = 6;

System.out.println("y has the value  " + y + " and z has the value " + z);
This program obviously prints:
variable x has the following value: 10
y has the value 5 and z has the value 6
Exercise 1-6 : Addition
Create a program to calculate the sum of two numbers. At the beginning of the program two variables are introduced and those variables hold the numbers to be summed. Feel free to use other variables if you need to.
For example, if the variables hold numbers 5 and 4, the program should output:
5 + 4 = 9If the variables hold numbers 73457 and 12888, the program output should be:
73457 + 12888 = 86345Exercise 1-7 : Multiplication
Create a program similar to the previous one except that it multiplies the two numbers instead of adding them.
For example, if the variables hold numbers 2 and 8, the program output should be:
2 * 8 = 16If the variables hold numbers 277 and 111, the program output should be:
277 * 111 = 30747What is the biggest multiplication that your program is able to calculate?
2.4 Reading User Input
So far our programs have been rather one-sided. Next we will learn how to read input from the user. We will use a special Scanner tool to read the user input.
Let us add the Scanner to our existing main program body. Do not worry if the main program body seems obscure as we will continue to write our code in the part marked // program code.
import java.util.Scanner;

public class ProgramBody {
    public static void main(String[] args) {
        Scanner reader = new Scanner(System.in);

        // program code
    }
}
2.4.1 Reading a string
System.out.print("What is your name? ");
String name = reader.nextLine(); // Reads a line of input from the user and assigns it
                                 //     to the variable called name

System.out.println("Hi, " + name);
What is your name? ~~John~~
Hi, John
The program above combined along with the main program body is shown below. The name of the program is Greeting, which means that it must be located in a file named Greeting.java.
import java.util.Scanner;

public class Greeting {
    public static void main(String[] args) {
        Scanner reader = new Scanner(System.in);

        System.out.print("Who is greeted: ");
        String name = reader.nextLine(); // Reads a line of input from the user and assigns it
                                         //     to the variable called name

        System.out.print("Hi " + name);
    }
}
When the program above is executed, you can type the input. The output tab in IntelliJ (at the bottom) looks as follows when the program has finished (the user inputs the name “John”).
Who is greeted: ~~John~~
Hi John
Process finished with exit code 0
2.4.2 Reading integers
Our Scanner tool is not good for reading integers, so we will use another special tool to read an integer. The command Integer.parseInt converts the string given to it into an integer. The command’s parameter is given between brackets and it returns an integer that can be assigned to an integer variable.
Basically, we are joining two commands together. First we read the input as a string from the user and immediately give it to the command Integer.parseInt.
System.out.print("Type an integer: ");
int number = Integer.parseInt(reader.nextLine());

System.out.println("You typed " + number);
Next we will ask the user to give us his name and age. The program body is included this time.
import java.util.Scanner;

public class NameAndAgeGreeting {
    public static void main(String[] args) {
        Scanner reader = new Scanner(System.in);

        System.out.print("Your name: ");
        String name = reader.nextLine();   // Reads a line from the users keyboard

        System.out.print("How old are you: ");
        int age = Integer.parseInt(reader.nextLine()); // Reads a string variable from the keyboard and transfers it to an integer

        System.out.println("Your name is: " + name + ", and you are " + age + " years old, nice to meet you!");
    }
}
2.5 Summary
The program body for interaction with the user is as follows:
import java.util.Scanner;
public class ProgramName {
    public static void main(String[] args) {
        Scanner reader = new Scanner(System.in);

        // code here
    }
}
Reading a string:
String text = reader.nextLine();
Reading an integer:
int number = Integer.parseInt(reader.nextLine());
Exercise 1-8 : Adder
Create a program that asks the user for two integers and then prints their sum.
Type a number: ~~6~~
Type another number: ~~2~~

Sum of the numbers: 8
In this example the user input is marked in red color. From now on the red color will indicate user input in examples.
Exercise 1-9 : Divider
Create a program that asks the user for two integers and prints their quotient. Make sure that
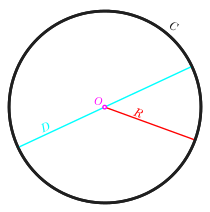
3 / 2 = 1.5. If the decimal part is missing, take another look at 5.1 Floating point numbers (decimal numbers) to find the solution.Type a number: ~~3~~ Type another number: ~~2~~ Division: 3 / 2 = 1.5Exercise 1-10 : Calculating the circumference
The circumference of a circle is calculated using the formula . Create a program that asks the user for the radius and then calculates the circumference using the given radius. Java already contains the value of pi in the
Math.PIvariable, which you can use in your calculation.Type the radius: ~~20~~ Circumference of the circle: 125.66370614359172Exercise 1-11 : Bigger number
Create a program that asks the user for two integers and then prints the larger of the two.
Tip: When you write Math. (that is, Math followed by a dot) in IntelliJ, it shows you a bunch of available mathematical calculations. For example,
Math.cos(10)calculates the cosine of the number 10. Try to find a suitable tool inMathto complete this exercise! If you cannot find anything suitable or do not know how to complete the exercise, skip the exercise for now. We will return to the matter later on.Type a number: ~~20~~ Type another number: ~~14~~ The bigger number of the two numbers given was: 20Exercise 1-12 : Sum of the ages
Create a program that asks for the names and ages of two users. After that the program prints the sum of their ages.
Type your name: ~~Matti~~
Type your age: ~~14~~

Type your name: ~~Arto~~
Type your age: ~~12~~

Matti and Arto are 26 years old in total.
Exercise 1-13 : NHL Statistics, part 1
A ready-made component
NHLStatisticsis included along with the exercise files for this excercise. It can be used to fetch and see NHL players’ score data, including their number of played games, goals, assists, points, and penalty amount.The main program imports (i.e. enables the use of) the component by adding the following line to the beginning of the file:
import nhlstats.NHLStatistics;. The next example prints the top 10 players based on points:import java.util.Scanner; import nhlstats.NHLStatistics; public class Main { public static void main(String[] args) throws Exception { Scanner reader = new Scanner(System.in); System.out.println("Top ten by points"); NHLStatistics.sortByPoints(); NHLStatistics.top(10); } }It will print (this was the situation on the 9th of January 2012):
Top ten by points
Henrik Sedin           VAN        43 11 + 38= 49  36
Phil Kessel            TOR        41 24 + 24= 48  10
Claude Giroux          PHI        36 18 + 30= 48  16
Joffrey Lupul          TOR        41 19 + 28= 47  36
Daniel Sedin           VAN        42 18 + 29= 47  32
Steven Stamkos         TBL        40 28 + 17= 45  34
Marian Hossa           CHI        41 17 + 27= 44  14
Evgeni Malkin          PIT        33 16 + 28= 44  30
Jordan Eberle          EDM        41 17 + 26= 43   6
Jason Pominville       BUF        41 14 + 29= 43   8
The name, abbreviation of the club, matches played, goals, assists, points and penalties of players are printed.
The first command
NHLStatistics.sortByPoints()sorts the list of NHL players by the points they have gathered. The second commandNHLStatistics.top(10);prints the ten first players from the list. Any integer can be given as a parameter.Similarly the players can be printed ordered by the goals or assists they have made, or by penalty minutes they have been given. First, we call the command to sort the players:
NHLStatistics.sortByPoints();     // orders the players by points
NHLStatistics.sortByGoals();      // orders the players by goals
NHLStatistics.sortByAssists();    // orders the players by assists
NHLStatistics.sortByPenalties();  // orders the players by penalty minutes
After that the players are printed with the command top using the number of players to be printed as its parameter.
It is also possible to use the component to request the statistics of a certain player:
NHLStatistics.searchByPlayer("Jaromir Jagr");  // prints stats of Jaromir Jagr
NHLStatistics.searchByPlayer("Koivu");         // prints stats of Mikko Koivu and Saku Koivu
NHLStatistics.searchByPlayer("Teemu");         // prints stats of all players named Teemu
The component can also print the statistics of all players in a club:
NHLStatistics.teamStatistics("NYR"); // Statistics of New York RangersThe order of the printed club statistics can be changed using a
sortBy...()first.The name of the club must be given using the official three letter abbreviation. You can check the abbreviations here. The statistics component prints a list of the available abbreviations if you request the statistics of an invalid club.
Create a program that does the following tasks into the main program body. The tasks must be done in exactly the same order as listed below. Do the tasks in the program body one after another without deleting tasks you have already done.
Note: When you first run the program, the execution might take a while because the information is downloaded from the web. Execution should be quick after the first run.
The program must do the following:
- Print the top ten players based on goals
- Print the top 25 players based on penalty amounts
- Print the statistics for Sidney Crosby
- Print the statistics for Philadelphia Flyers (abbreviation: PHI). Note in which order the players are printed in and why that might be!
- Print the players in Anaheim Ducks (abbreviation: ANA) ordered by points
After you have successfully submitted the exercise, you can play with the code as you wish!
end of week 1